Aluminium Canvas!

My budding artist has been doodling and drawing everywhere everyday! She has often requested for blank paper, and she will engage herself for an interrupted hour just engrossed in penning her thoughts into pictures, and even drafting her own storybook with illustrations. Besides running out of spare paper for her indulgent interest, I thought of giving her another medium to work with, and to spark some alternative way of working with other materials.

IMG_1818

I saw this idea online, and thought I should it out with my enthusiastic artist! The steps are pretty easy, and the results stunning!

First, recycle a paper board, and tape a thick string to form lines/compartments on the board. That way, you create a little matrix pattern on it. Make sure to tape them down securely on the back of the board.

IMG_3878unnamed

Next, you place the aluminium foil over the patterned board, and press down where the lines are. This will make the dividing lines more visible.

IMG_3884    IMG_3890

The last part is the most fun segment for my little one. She could not wait to start doodling and drawing with the permanent pens of different colours. She created circular patterns, and also drew figurines and characters on her ‘storyboard’. She was so captivated by the new experience of using different surface to draw on!

IMG_1817  IMG_1818 IMG_1823   IMG_1816


The end product is really stunning, and the aluminium canvas makes for a wonderful window display for my child’s playroom!

IMG_1828

Lego Word Families!

 Language Development

Word families are groups of words that have a common spelling pattern – they have some of the same combinations of letters in them and a similar sound. Words like cat, hat, and fat are a family of words with the “at” sound. Children progress as better readers when they can identify chunks in words like word families (e.g. Words ending with -at, -in) In teaching word families, children learn how to blend sounds (like c-at, b-in). It helps them to decode words faster, improving their word recognition skills as well as spelling skills. Reading books with lots of rhymes like Dr Seuss also helps develop their phonological awareness.

For emergent readers, after they have mastered the phonics sounds, they can proceed to learn word families or words that rhyme. Some word families you can start with are -at, -in, -ig, -an, -ing, -ot. Helping my active learner master the word families is a major milestone in her language acquisition process. To make the learning fun and enjoyable, this simple Lego game requires little preparation and money! It is also a good idea to recycle some of the Duplo Lego bricks that your 4/5 year-old has outgrown!

Simply write out some word family words on sticker labels and group them according to colour.

IMG_1708

Then lay them out on a tray, and invite your learner to listen to each word you read.

IMG_1743    IMG_1744


Model the blending for your child. Example: “/C//A//T/”

Find words that rhyme. Stack them up accordingly.

IMG_1721

This simple activity requires listening skills, and builds phonemic awareness/ strengthen their grasp of the sound structures in words families.

Seeing the patterns in the spelling will further prepare them for spelling skills in future.

IMG_1727

Given my preschooler who is always brewing up imaginative ideas. she imagined the Lego characters to be having a competition, and she positioned each character who came in first, second and third in a race! Guess who is the winner? 🙂

IMG_1733     IMG_1730

For more word families activities, check out the following ideas we had!

Using Scrabble Chips to teach word families!

Teaching Word Families- Using Scrabble Chips

Word families Game using paper rolls and balls!

Word families- With Balls and Toilet Rolls!

Wooden Blocks Word families- Onset and Rimes

Word Families- Onset & Rime Blocks

10 activities on teaching word families

10 Fun Activities on Word Families!

Chinese Fan Painting

I love these Chinese fans on sale in Daiso or any Chinese culture-themed shops. They are great canvas material for painting Chinese motifs, and creating awareness of the Chinese Culture.

First off, I showed my daughter some images of Chinese painted fans from the web, and asked her some questions like:

1. What objects do you see on the fans? (flowers, phoenix, peacocks, butterflies, goldfish, etc)

2. What are some of the colours you can see? (red, pink, yellow, blue)

3. Are the colours dull or vibrant?

4, Are the objects outlined with black? Do you see some Chinese characters written on the fan? What do you think it says?

5. If you can paint on a Chinese fan, what will you like to draw?

Once I tickled my girl’s interest in Chinese fans, she was eager to start working on it.
Given her fetish with flowers and butterflies, she readily shared her ideas with me about painting this motif on the fan.

First, she drew out the outline of the flowers and butterflies using simply a pencil.

IMG_9733

With these lovely paint pots, she was presented with an array of subtle colours from which she could choose the colour from.

IMG_9747

What I love about this project is observing how she focuses on filling the objects with colours, and training her fine motor skills of the pencil grip through holding the paintbrush.

IMG_9736     IMG_9755

While painting, she was also narrating her own imaginative scripts of how the butterflies first met each other among the flowers, and soon became good friends and played as they fluttered in the sky. I love just being present through the art process and hearing out her own thoughts and ideas on the subject matter. It allows me a glimpse into her thinking process and creates a great opportunity for me to encourage her to express her ideas into words. The process of art includes not just visual, but also verbal expression of ideas. I could think along with her, and ask her leading questions to help her deepen and develop her ideas, and in turn add complexity and depth to her artwork.


IMG_9745   IMG_9751

After a process of concentration and focus, my girl thoroughly enjoyed the creative process, and loved her end product. That’s the unspeakable joy of art-making! And it makes a perfect artpiece for display!

IMG_9761    IMG_9760


Addition Game!

Children learn numbers to represent quantities and to solve quantitative problems. Some pre-skills needful for learning addition include counting, one-to-one correspondence, the concepts of part-while relationship, number bonds, and perhaps recognition of small quantities by sight and grouping objects together.

Learning how to add is an important milestone in a child’s math development. Children develop different strategies to learn how to add- like working with combining small quantities together, using concrete objects to help them count the total number and model approaches.

It is important that your child is ready for such addition concepts. Follow your child’s interest in numbers, and concretise the learning with pictures, visual aids and hands-on materials!

I knew my girl was ready when she came home one day and told me she wants to add using counters. I was delighted she initiated that! A good guess will be she has been using these Montessori materials in her preschool. Using concrete materials to learn is ingrained in them from early exposure to Montessori approach to learning. Visualising the addition process for a Montessori learner is effortless and engaging!

For this hands-on activity, you simply can gather some materials from home:
1. writing board or writing paper
2. Small objects like chips, counters, macaroni, poms poms, or pebbles.
IMG_1623

IMG_6535

IMG_6517
3. Number dice or number spinners
IMG_6574

IMG_1571

To play this game, just ask your child to roll the dice or spin a number.
IMG_1607

IMG_1571

Then ask your child to write out the addition sentence using the two numbers.
IMG_1600

Represent the two numbers using the small objects.
Then model the process of addition by counting all the objects represented.
IMG_1589

IMG_1614

Complete the addition sentence by writing in the total quantity.
IMG_1579

Some educational videos also make learning fun!
click on the links below!


Learning how to add can be fun and interactive!!

Fairy Dust Playdough Set

We are all familiar with how play dough has captivated children of all ages! They are fabulous for fun and learning! Here are 5 ways how it helps your child to develop!

1. Fine motor skills

Play dough is ideal for building the tiny motor skills through your child manipulating the malleable material by rolling, pressing, pinching, chopping, shredding and much more!

Poking in objects into the play dough requires focus and coordination.

IMG_9797 IMG_9789

2. Develops creativity and imagination

Play dough provides endless possibilities for imaginative play and can represent anything in the mind of a child!

3. Great for building Cognitive skills!

Using play dough with letter shapes us great for letter recognition, and inserting small objects like buttons into play dough can be used for counting! Children can use the play dough to compare sizes, length and thickness. They can roll little balls and learn one to one correspondence, and even addition. They can also sort the balls by colour! iThe choices for learning are limitless!

4. Making Play dough- Great for Science concepts!

When you make play dough with your child, your child gets to be amazed by the process of mixing different ingredients into something gooey, and sticky! They learn to use their senses to learn about texture, and see the process of transformation of different materials!

5. Great for Language Development

Pretend play with play dough contributes greatly to your child’s language play. Interacting with play dough, your child taps on her imagination and comes up with play scripts, where she conceives ideas for a social scenario, and uses her vocabulary and functional language to verbalise and ‘act out’ her ideas. She engages herself in social dialogues and learn to think of solutions to problem-solve.

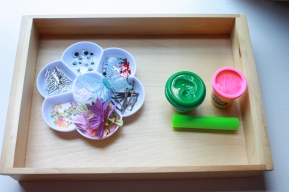
Our Fairy Dust Play Dough Setup

My little darling has been preoccupied with the theme of fairies in the woods, their magical journeys and fantasies of adventure and wonder.

To encourage creativity, I like to use open-ended materials for her to tap on her imagination and encourage originality.

This thematic fairy-dust playdoh set is easy to set up! And is perfect for a whole afternoon of make-believe and pretend play!

IMG_9772  IMG_9763IMG_9765 IMG_9766 IMG_9767

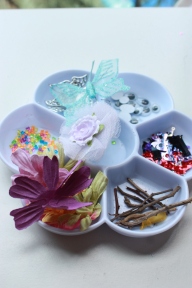
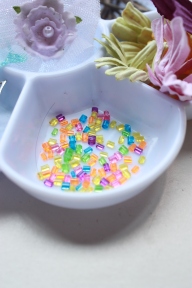
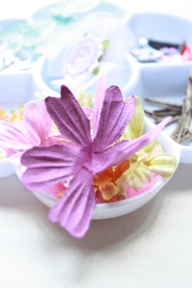
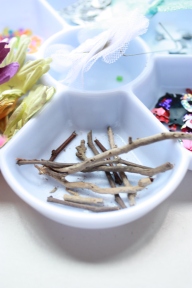
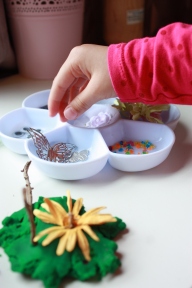
Presenting the materials on a tray is like an invitation to play! which no child can resist!

IMG_9779 IMG_9778

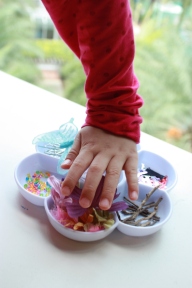
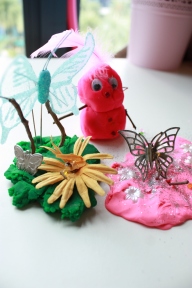
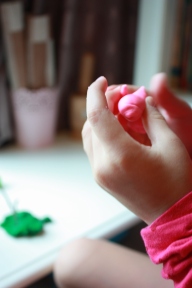
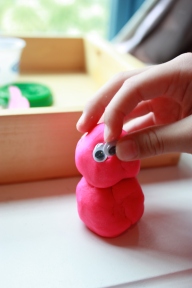
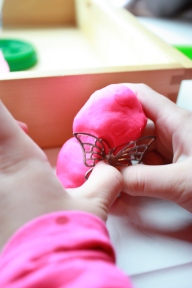
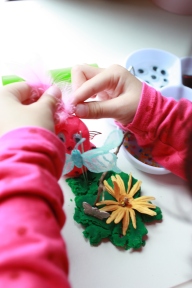
My little one immediately was captivated by the myriad of materials, and started coming up with her ideas as to how to use the materials. As she picks out the different materials, she used adjectives to describe the twigs and the paper flowers. She also started coming up with incredulous ideas about how a fairy has wings, and was  playing in the Pixie Garden. To make the fairy, she had to first used her palm to roll the play dough, and then estimate how to make a big and smaller ball. To join the parts together, I suggested to her using a sharp long object, and she immediately picked out the twig. To create the wings, she selected the angel wing embellishment and pressed it hard to make it stay. Using the eyes and twigs as hands, she completed the look of her little make-believe fairy!

IMG_9794 IMG_9804  IMG_9813

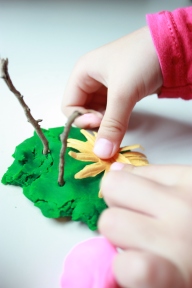
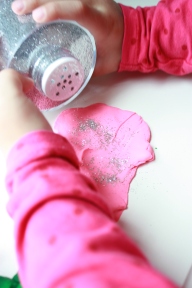
Next, to create the setting for the main character, she decided to make a garden! She stayed on task for a prolonged period of time trying to actualise her ideas for the garden! She flattened the dough to create grass and ground for the fairy to stand on. Then she inserted flowers and twigs to make it natural looking. She also added in little garden creatures like butterflies and worms. This was a great opportunity for me to use thematic vocabulary like different garden animals! To complete the garden look, she started referring to Tinklebelle story about pixie dust. She then sprinkled some glitter into the play dough and the wonder happened!

IMG_9819 IMG_9830 IMG_9844

Look at her little Fairy Garden with her Fairy! I love how this process of  creating art and actualising her ideas!

The process of creation far supersedes the finished product!

IMG_9881


Tantalizing Tartlets! A Simple Baking Experience!

Making Tartlets

I saw these lovely tartlet shells at Cold Storage, and I thought this is a sure winner for busy moms like me who have always wanted to bake with my little girl, but simply have no time to make everything from scratch!

For simple baking and decorating, you simply need:

1. Tartlet shells

IMG_9621

2. Nutella! ( or heat up chocolate chip drops in the pan)

IMG_9619

3. Decorating ingredients like sprinkles, pearl drops and anything pretty! (just visit any baking supplies shop!)

IMG_9613

Using a spoon to scoop up the Nutella, and carefully pouring it to fill the void in the tartlets, my little preschooler was honing her fine motor skills of scooping and transferring. Not wanting the chocolate filling to spill over, she had to practice using her concentration skills. Using a spoon also helps her to estimate the quantity needed to nicely fill up the tartlet with just enough Nutella. Her first couple of attempts had her scooping up too much Nutella, and over-spilling it. So I took delight in watching her realise for herself that a smaller quantity is needed.

IMG_9637   IMG_9641


Decorating the Tartlets

Next comes her favourite part! Decorating the tartlets with pretty attractive toppings! We are spoilt for choices as we just received a gift pack of nice dainty toppings collection from a friend !

IMG_9643   IMG_9647


My little preschooler pinched up small toppings, that are so inviting for a lick! Practising her pincer grip, she selected her own combination of different coloured toppings and sprinkled them delightfully on the tartlets. It was simply a feast for the eyes, even without tasting them!

IMG_9654


Put these lovely, nicely decorated tartlets in the oven for a mere ten minutes, and they instantly become a delectable, pretty snack for you and your little wannabe pastry chef!!

IMG_9661 IMG_9664  IMG_9656


Creating Aboriginal Art using Pom Poms

method=get&s=dot-cover

We have been reading my all-time favourite book “The Dot” by Peter Reynolds. The endearing story is about a boy who turned from a reluctant learner to an inspired artist! My girl was so captured by the story that she said she wanted to make dots and create art. My mind somehow wandered to the art method of aboriginal art, where I remembered the aboriginal artwork I saw during my time living in Sydney, Australia.

1. Samples Of Aboriginal Art

As a tuning-in activity, I showed her some aboriginal art and we talked about the dots of different sizes and colours that make up the image.

Dot_Painting_by_WildHusky318 dot-paintings

2. Materials

I thought about how to make dots on paper, and the idea of using poms poms and pegs struck me. So this simple setup consist of:

1. pom poms

2. Clothes pegs

3. paint

IMG_9547   IMG_9548

4. Dot painting templates

(examples: http://media-cache-ec0.pinimg.com/originals/bf/7d/0a/bf7d0a8d49706fbec33075857ffc2267.jpg)

1dc2a3dc3ce1498030bebbdacc38bd01 7e716612b5f8abf210dcc511246b7bfe   IMG_9556


Since my little girl’s interest is in princesses, I sourced out these templates online of Belle and Cinderella. With all the materials set up, she knew at one glance that we were going to make dots.

3. Demonstration

Showing her how to use the clothes pegs to secure the pom pom, and dipping into the paint was my favourite part. My little artist wore  the look of wonder on her face.

IMG_9559    IMG_9561

This activity is so great in developing fine motor skills, and hand-eye coordination. The array of colours allow for choice and the child gets to learn how to focus and complete the dot painting independently.

IMG_9589    IMG_9592

If you have this little paint pots, it is also great for this art process, and less messy! Just dip the pom poms in!!

IMG_9544  IMG_9597

4. Creating her own aboriginal art!

Once she has gained confidence and developed mastery on how to make the dot prints, we then proceeded to creating our own aboriginal artpiece.

She wanted to make a fish, and with the outline I drew out, she traced the lines with dots, and filling in the spaces with more dots! Very soon, the picture of the fish emerged.

It was so rewarding seeing whole art process of her exercising her own autonomy of the choice of colours, the intrinsic motivation of seeing her project completed!

IMG_9610 IMG_9611


Why not try this simple and beautiful way of creating and appreciating art forms with your little one? 🙂

10 Frozen Fun Activities!

 10 Frozen Fun Activities!

The insane popularity of this Disney movie has gotten kids singing the theme songs in the malls, classrooms and kids’ playdates.

Tapping on my little girl’s interest in the movie hit Frozen, I have decided to capitalise on that to come up with 10 different sensorial and learning activities!

1. Pretend Play

My 3 year old has been so captivated by the characters in Frozen movie, that she does all kinds of pretend play with her princess dolls.

I enjoy watching and being amused by the play scripts my girl comes up with whenever she is engaged in pretend, dramatic play. The latest being the conversations and songs between the Frozen sister, Elsa and Anna

IMG_9542

2. Making a Snowflake!

Snowflake Ornament

Tying in with the Frozen Movie craze, my gal has been fascinated with the idea of snow despite our hot humid weather all year round.

I thought why not let her experience deeper with the concept of snow by making a snowflake ornament, with the colour theme blue, so as to add to her Frozen props for role-play!

IMG_9488     IMG_9478

 3. Frozen Ice!

Frozen Fun!

I thought to make the play scene more elaborate and sensorial, why not create some frozen fun for her with some ice blocks and ice cubes?

To make the ice blocks, simply recycle your plastic containers, add some blue food colouring and freeze it overnight! And you are ready to enact the play scene!

IMG_9424IMG_9455

4. Frozen Snow Globe!

Frozen Snow Globe!

One of my favourite activities is to come up with a snow globe, based on the theme of snow and winter throughout.

The shimmering magic of snowfall is always transfixing, whether s it winter or not for your season.

These globes allow your child to create a wintry scene straight out of their own imagination.

IMG_9502   IMG_9517

5. Storytelling with the books!

Nothing like retelling this heartwarming plot through the use of books! Allow your child to experience the depth of the characters and seeing the story come alive through the use of beautiful illustrations!

6. Olaf Marshmallow!

Kids will love this food making activity! Just get marshmallows, chocolate chips, raisins and some orange icing and they are ready to make the adorable snowman that is also edible!

20140610-163032.jpg

7. Olaf Sushi!

Thanks to my sister-in-law who ingeniously created this incredible Olaf Sushi! This is too cute to be eaten, but my girl gobbled it all up in no time!

20140610-163135.jpg

8. Stickers

Why not add some magnetic tape on the Frozen character stickers and create props for the children to enact scenes from the story on magnetic whiteboards?

9. Making an Olaf Snowman!

You can create a Olaf tray where the child has to assemble the different Olaf snowman body parts together!

20140610-163112.jpg

10. Colouring & Drawing

For some quiet seat work, colouring is great for them to focus and fill the pages of their favourite characters with colour! Drawing the characters out also stretches their imagination and builds their attention to details. We were at a play date when the kids started drawing the characters on white sheets and even on paper plates!

For colouring pages, just google Frozen Colouring Pages

20140610-163000.jpg   20140610-163053.jpg

Have an icy blast with the kids with these activities! 🙂


Frozen Snow Globe!

FROZN_014M_G_ENG-GB_70x100.indd

Tapping on my little girl’s interest in the movie hit Frozen, I have decided to capitalise on that to come up with different sensorial and learning activities based on that.

One of my favourite activities is to come up with a snow globe, based on the theme of snow and winter throughout.

The shimmering magic of snowfall is always transfixing, whether s it winter or not for your season.

These globes allow your child to create a wintry scene straight out of their own imagination.

IMG_9517  IMG_9520

To make the snow globe, you simply need:

1. Recycled glass jars

2. Figurines of the characters/ stickers

3. Glitter, sequins, little buttons

4. Distilled water

5. Glycerin (optional)

IMG_9504   IMG_9505

Step one:

Recycle your jars from the baby food, jam jars, or buy a cheap one from Daiso.

Simply choose your favourite figurines and glue them on the jar lids securely.

IMG_9502

Step Two:

Add the distilled water and a little glycerin to prevent the flakes from falling too quickly.

Then add the shimmer glitter, sequins or white ‘snow’ to create the snowy effect.

IMG_9506

Step three:

Secure the lid tightly and close the jar. Turn it upside down repeatedly and let it snow!

IMG_9532

Snowflake Ornament

Tying in with the Frozen Movie craze, my gal has been fascinated with the idea of snow despite our hot humid weather all year round.

I thought why not let her experience deeper with the concept of snow by making a snowflake ornament, with the colour theme blue, so as to add to her Frozen props for role-play!

IMG_9495   IMG_9487

For this simple craft idea, you only need:

1. Ice-cream sticks

2. Glue

3. Embellishments such as spangles, glitter, adhesive gemstones, buttons or glitter glue, etc

4. Ribbons

IMG_9477     IMG_9464

First, just glue the ice-cream sticks together diagonally to form the snowflake
IMG_9465

Then, embellish and decorate it by sticking or pasting spangles, gemstones or buttons to create the blue and white  theme for the snowflake!

IMG_9472

Add pattern on it by using glitter glue to draw on it! you can also use glue and sprinkle glitter powder on it!

IMG_9478    IMG_9480

Lastly, just add a ribbon to hang the ornament, and it will look so lovely by the window!

IMG_9486   IMG_9488  IMG_9489